diy rfid blocker
December 22, 2025
diy rfid blocker proposal! diy rfid blocker official support.GOV,diy rfid blocker active!
# DIY RFID Blocker
 ## What Is an RFID Blocker and How Does It Work?
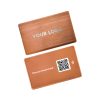
An RFID blocker is a device or material designed to protect your RFID-enabled cards and passports from unauthorized scanning. RFID (Radio-Frequency Identification) technology is widely used in contactless credit cards, access cards, and e-passports. While convenient, these items can be vulnerable to "skimming" or unauthorized reading by thieves using portable RFID readers. An RFID blocker works by creating a shield—usually made of conductive materials like metal or special fabrics—that blocks electromagnetic fields, preventing signals from reaching the chip in your card.
In my personal experience, I became concerned about RFID security after reading news reports of digital pickpocketing. As someone who values privacy, I decided to explore DIY solutions. I've always had a knack for hands-on projects, and creating my own RFID blocker felt like a practical way to combine my interest in technology with security awareness.
## Materials and Tools for a DIY RFID Blocker
To make an effective DIY RFID blocker, you'll need a few key materials. The most common approach involves using conductive fabric or aluminum foil. Here’s a basic list:
- Conductive fabric or material (e.g., copper mesh, RFID-blocking fabric)
## What Is an RFID Blocker and How Does It Work?
An RFID blocker is a device or material designed to protect your RFID-enabled cards and passports from unauthorized scanning. RFID (Radio-Frequency Identification) technology is widely used in contactless credit cards, access cards, and e-passports. While convenient, these items can be vulnerable to "skimming" or unauthorized reading by thieves using portable RFID readers. An RFID blocker works by creating a shield—usually made of conductive materials like metal or special fabrics—that blocks electromagnetic fields, preventing signals from reaching the chip in your card.
In my personal experience, I became concerned about RFID security after reading news reports of digital pickpocketing. As someone who values privacy, I decided to explore DIY solutions. I've always had a knack for hands-on projects, and creating my own RFID blocker felt like a practical way to combine my interest in technology with security awareness.
## Materials and Tools for a DIY RFID Blocker
To make an effective DIY RFID blocker, you'll need a few key materials. The most common approach involves using conductive fabric or aluminum foil. Here’s a basic list:
- Conductive fabric or material (e.g., copper mesh, RFID-blocking fabric)
 - Scissors or a cutting tool
- Adhesive (like fabric glue or double-sided tape)
- A template (such as a card sleeve or wallet pattern)
- Optional: sewing kit if you're making a fabric-based blocker
From my perspective, using conductive fabric is more durable and aesthetically pleasing than aluminum foil, though foil can work in a pinch. I once made a simple card sleeve using copper mesh, and it was surprisingly effective. This project didn't require any special skills—just careful measuring and cutting.
- Scissors or a cutting tool
- Adhesive (like fabric glue or double-sided tape)
- A template (such as a card sleeve or wallet pattern)
- Optional: sewing kit if you're making a fabric-based blocker
From my perspective, using conductive fabric is more durable and aesthetically pleasing than aluminum foil, though foil can work in a pinch. I once made a simple card sleeve using copper mesh, and it was surprisingly effective. This project didn't require any special skills—just careful measuring and cutting.
 ## Step-by-Step Guide to Creating Your Own RFID Blocker
### Step 1: Measure and Cut the Material
Start by measuring the size of your card or passport. For a card sleeve, cut two pieces of conductive fabric slightly larger than the card to allow for seams.
## Step-by-Step Guide to Creating Your Own RFID Blocker
### Step 1: Measure and Cut the Material
Start by measuring the size of your card or passport. For a card sleeve, cut two pieces of conductive fabric slightly larger than the card to allow for seams.

 ### Step 2: Assemble the Blocker
If using fabric, sew the pieces together on three sides, leaving one side open for insertion. For a quicker version, you can use adhesive to bond the edges. Ensure there are no gaps where signals could leak through.
### Step 3: Test
### Step 2: Assemble the Blocker
If using fabric, sew the pieces together on three sides, leaving one side open for insertion. For a quicker version, you can use adhesive to bond the edges. Ensure there are no gaps where signals could leak through.
### Step 3: Test
The Use of RFID for Human Identity Verification
## What Is an RFID Blocker and How Does It Work?
An RFID blocker is a device or material designed to protect your RFID-enabled cards and passports from unauthorized scanning. RFID (Radio-Frequency Identification) technology is widely used in contactless credit cards, access cards, and e-passports. While convenient, these items can be vulnerable to "skimming" or unauthorized reading by thieves using portable RFID readers. An RFID blocker works by creating a shield—usually made of conductive materials like metal or special fabrics—that blocks electromagnetic fields, preventing signals from reaching the chip in your card.
In my personal experience, I became concerned about RFID security after reading news reports of digital pickpocketing. As someone who values privacy, I decided to explore DIY solutions. I've always had a knack for hands-on projects, and creating my own RFID blocker felt like a practical way to combine my interest in technology with security awareness.
## Materials and Tools for a DIY RFID Blocker
To make an effective DIY RFID blocker, you'll need a few key materials. The most common approach involves using conductive fabric or aluminum foil. Here’s a basic list:
- Conductive fabric or material (e.g., copper mesh, RFID-blocking fabric)
- Scissors or a cutting tool
- Adhesive (like fabric glue or double-sided tape)
- A template (such as a card sleeve or wallet pattern)
- Optional: sewing kit if you're making a fabric-based blocker
From my perspective, using conductive fabric is more durable and aesthetically pleasing than aluminum foil, though foil can work in a pinch. I once made a simple card sleeve using copper mesh, and it was surprisingly effective. This project didn't require any special skills—just careful measuring and cutting.
## Step-by-Step Guide to Creating Your Own RFID Blocker
### Step 1: Measure and Cut the Material
Start by measuring the size of your card or passport. For a card sleeve, cut two pieces of conductive fabric slightly larger than the card to allow for seams.
### Step 2: Assemble the Blocker
If using fabric, sew the pieces together on three sides, leaving one side open for insertion. For a quicker version, you can use adhesive to bond the edges. Ensure there are no gaps where signals could leak through.
### Step 3: TestPhone: +86 19925232774
Hours: Mon-Fri 9:00AM - 6:30PM